
Tutorial GNSS ComNav RTK T300 SinoGNSS Base and Rover GNSS Surveying Instruments ... High Stability SinoGNSS Comnav T300 GNSS Glonass Receiver Compatibled.
₪ Commencer CGSurvey
1. Cliquez sur Start pour ouvrir CGSurvey:
1. Cliquez sur Start pour ouvrir CGSurvey:
2. Ajouter un nouveau Datum si vous ne trouvez pas le système de coordonnées dont vous avez besoin.
⊶ Allez dans Config ➪ Datum Manager ➪cliquez sur New et entrez Nom de donnée.
⊶ Dans Ellipse Par, sélectionnez l'ellipsoïde existant ou créez un nouvel ellipsoïde en entrant des paramètres. Dans Projection par, choisissez un type de projection approprié et entrez les paramètres correspondants.
₪ Connexion Bluetooth
1. Pour connecter votre contrôleur au récepteur T300, cliquez sur Config➪Work Mode
⊶ cliquez sur BT Config ➪ Activer Bluetooth ➪ cliquez sur menu ➪ Bluetooth Settings.
⊶ Dans l'onglet Périphériques, cliquez sur Add new device pour rechercher le périphérique Bluetooth.
⊶ sélectionnez le numéro SN correspondant du récepteur ➪ cliquez sur Next.
Conseil: Assurez-vous que le récepteur T300 est sous tension avant de rechercher des appareils.
⊶ Entrez le code d'accès «0000» et cliquez sur Next ➪ Advanced.
⊶ Vérifiez le Serial Port➪ cliquez sur Save.
⊶ Ensuite, allez sur l'onglet COM Ports, cliquez sur new outgoing port pour configurer un port COM sur votre récepteur.
⊶ Ensuite, allez sur l'onglet COM Ports, cliquez sur new outgoing port pour configurer un port COM sur votre récepteur.
⊶ Sélectionnez le bon SN du récepteur ➪ cliquez sur Next ➪ choisissez un port COM (décochez Secure Connection) ➪ Finish.
⊶ Le SN et le port COM correspondant sont affichés dans l'onglet COM Ports, cliquez sur OK ➪ Done pour revenir à la fenêtre du mode de travail.
₪ Démarrer la station de base
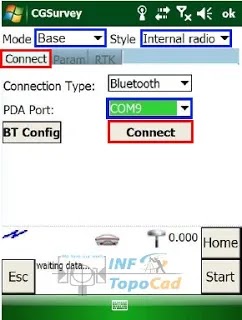
Tout d’abord, établissez une connexion Bluetooth entre le récepteur T300 et votre contrôleur, comme indiqué avant ➪cliquez sur Connect.
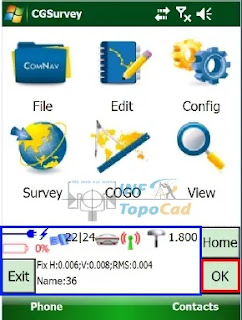
Une fois la connexion établie, l’état de la position sera affiché (H, V, RMS).
Connect :
Paramètre :
RTK:
Position
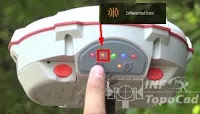
⦿ Vérifiez le voyant différentiel sur le panneau avant. Il clignote une fois par seconde pour indiquer que la station de base transmet les données de correction.
Connect :
⦿ Ensuite, vous pouvez configurer le récepteur T300 avec le mode de levé requis et le style en fonction des instructions ci-dessous.
⦿ Choisir le mode de levé Base et le Style Internal radio
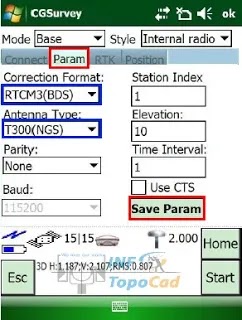
⊶ Deuxièmement, modifiez les paramètres, y compris le format de correction, le type d’antenne et les protocoles de communication:Paramètre :

⦿ Sélectionnez RTCM3 (BDS) comme format de correction, sinon choisissez RTCM3 si vous ne vous trouvez pas dans la zone de couverture de Beidou.
⦿ Sélectionnez T300 comme type d’antenne.
⦿ Cliquez Save Param
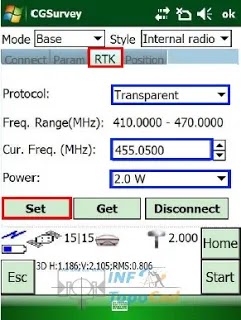
RTK:

⦿ Sélectionnez Transparent comme protocole (mode de transmission et de réception)
⦿ Réglez la fréquence et la puissance appropriées
Conseil: Si vous utilisez une antenne externe en mode radio interne, vous devriez régler Power sur 2,0 W.
⦿ Cliquez sur Set
Position
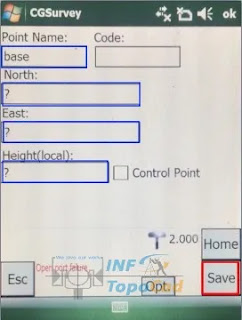
Pour démarrer Base à partir d'un point connu, aller au menu principal
⦿ Cliquez sur Choose pour sélectionner le point connu.
⦿ Saisir la hauteur de l’antenne
⦿ Cliquez sur Start pour terminer la configuration.
⦿ Cliquez sur OK pour enregistrer la configuration.

⦿ Vérifiez le voyant différentiel sur le panneau avant. Il clignote une fois par seconde pour indiquer que la station de base transmet les données de correction.
₪ Démarrer la station Rover
Connectez votre contrôleur au récepteur T300 et attribuez au mobile un autre port COM différent de celui de la base.
⦿ Cliquez sur Config ➪ Work Mode
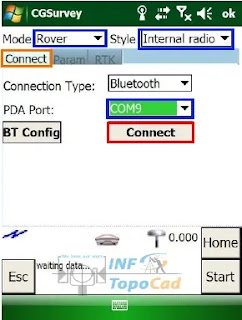
Connect :
⦿ Sélectionnez Rover en tant que mode et la Internal radio en tant que style.
⦿ Sélectionnez le PDA Port que vous avez défini pour le Rover
⦿ Cliquez sur Connect
RTK:
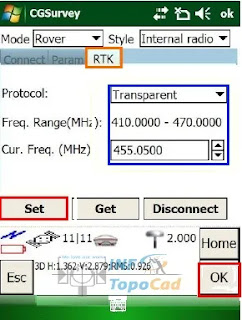
RTK:

⦿ Pour réussir la liaison de données, définissez le même protocole et la même fréquence que la base.
⦿ Vérifiez le voyant DEL du différentiel sur le panneau avant. Il clignote une fois par seconde pour indiquer que la station mobile reçoit les données de correction.







Aucun commentaire:
Enregistrer un commentaire